20 More, Somehow Even Smaller, Mazes Guide
20 More, Somehow Even Smaller, Mazes Walkthrough: All 20 Mazes Solutions
Full walkthrough — tutorial through Maze 20, every solution with spoilers, codes, and assembly steps.
Last updated: September 18, 2026
Start Here
20 puzzles + tutorial — no fixed order. Spoiler blocks below for every solution, digit code, and ad-puzzle X assembly.
If you ask "where I go next?", start with sections below on this 20 More, Somehow Even Smaller, Mazes hub page.
Twenty micro mazes and one achievement — whole game fits one coffee break. I wrote every solution below so you not stare at a three-pixel corridor for twenty minutes.
Controls: arrow keys move the dot (or the maze, depending on level). Zoom matters on the last few — mouse wheel or zoom buttons. Screenshots sit inside spoilers next to the solution — open only when you stuck.
Jump to
- Tutorial — Example Maze
- Maze 1 — Recursive Maze
- Maze 2 — 1 2 3 4 5
- Maze 3 — Squash and Stretch
- Maze 4 — Four Square
- Maze 5 — Move Two Matchsticks
- Maze 6 — Sliding Puzzle
- Maze 7 — Scrolling, Narrow Puzzle
- Maze 8 — Some Assembly Required
- Maze 9 — Eat All The Dots!
- Maze 10 — I Drew This Puzzle On A Napkin Over Dinner
- Maze 11 — Auto-Tiles
- Maze 12 — Unwanted Advertising
- Maze 13 — You Are The Maze-ish Thing
- Maze 14 — Back From The Klondike
- Maze 15 — The Dots In These Mazes Do Not Move
- Maze 16 — Magnifying Glass (Whoops Too Small)
- Maze 17 — Gee, I Hope This Maze Doesn't Explode
- Maze 18 — Connect 100% Of The Dots
- Maze 19 — Enable Puzzle (Here Is A Door. Where Is The Dot?)
- Maze 20 — The Final Maze
Maze overview
| # | Maze | Hook |
|---|---|---|
| Tutorial | Example Maze | Movement tutorial |
| 1 | Recursive Maze | Three locked segments |
| 2 | 1 2 3 4 5 | Digit locks on the grid |
| 3 | Squash and Stretch | Widen = left button (↔) |
| 4 | Four Square | Slide the four tiles into one connected maze first |
| 5 | Move Two Matchsticks | Matchstick layout |
| 6 | Sliding Puzzle | Classic tile slide |
| 7 | Scrolling, Narrow Puzzle | Viewport scrolls |
| 8 | Some Assembly Required | Build this shape from the scattered pieces (match the preview silhouette) |
| 9 | Eat All The Dots! | Pac-man rules |
| 10 | I Drew This Puzzle On A Napkin Over Dinner | Tiny napkin grid |
| 11 | Auto-Tiles | Moving dots puzzle |
| 12 | Unwanted Advertising | Pop-up ads block the maze |
| 13 | You Are The Maze-ish Thing | You move the maze walls, not always the dot |
| 14 | Back From The Klondike | Solitaire-style logic |
| 15 | The Dots In These Mazes Do Not Move | Static dots |
| 16 | Magnifying Glass (Whoops Too Small) | Drag the magnifying glass over the tiny maze in the bottom-left |
| 17 | Gee, I Hope This Maze Doesn't Explode | Maze explodes into pieces |
| 18 | Connect 100% Of The Dots | Numbered dots |
| 19 | Enable Puzzle (Here Is A Door. Where Is The Dot?) | Press Enable Puzzle, then Zoom Out |
| 20 | The Final Maze | Spell LABYRINTH with movement keys (each letter = a move) |
Tip: Mazes can be tackled in any order — use Jump to to find the puzzle name you stuck on.
Solutions
Tutorial — Example Maze
Mechanic: Movement tutorial — learn arrows before the real puzzles.
Solution
Up, Up, Right, Down, Down, Right, Up, Up
Maze 1 — Recursive Maze
Mechanic: Three locked segments — grab First Key, then Second Key, then reach the Exit Door.
First Key
Up, Left, Down, Down, Right, Right, Up, Left, Left, Up, Left, Left, Down, Left, Left, Left, Down, Down, Left
Second Key
Right, Up, Up, Right, Right, Right, Up, Right, Right, Down, Left, Down, Left, Left, Down, Down, Down, Left, Left, Up, Up, Left, Up, Left, Left, Up, Up, Up, Right, Up, Up, Right
Exit Door
Left, Down, Down, Left, Down, Down, Down, Right, Right, Down, Right, Down, Down, Left, Left, Up, Left, Up, Up, Left, Up, Right, Right, Up, Up, Up, Right, Up, Up
Maze 2 — 1 2 3 4 5
Mechanic: Digit locks on the grid — enter the code, then walk the trivial exit.
3-digit code puzzle
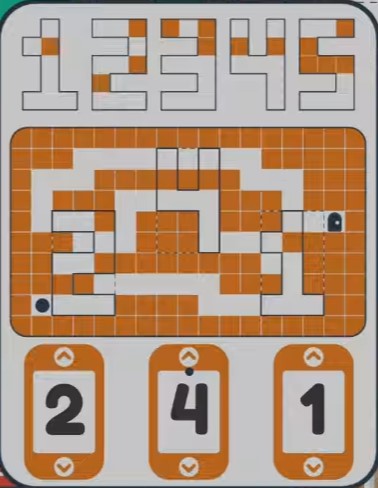
Enter 2 4 1. Exit is trivial once the code accepts.
Maze 3 — Squash and Stretch
Mechanic: Widen = left button (↔). Tallen = right button (↕). Stretch the maze before you move.
Solution
Widen, Up, Tallen, Right, Widen, Down, Down, Tallen, Left, Left, Widen, Up, Tallen, Left, Left, Widen, Down, Tallen, Left, Left, Widen, Up, Up, Tallen, Right, Widen, Up, Up, Up, Tallen, Right, Right, Widen, Down, Tallen, Right, Widen, Up, Up, Tallen, Left, Left, Left, Left
Maze 4 — Four Square
Mechanic: Slide the four tiles into one connected maze first.
Solution
Up, Left, Down, Left, Left, Up, Right, Up, Left, Up, Right, Right, Right, Down, Left
Exit is trivial once assembled.
Maze 5 — Move Two Matchsticks
Mechanic: Matchstick layout — two moves unlock the ball path.
- Move the matchstick left of the ball to the gap below it.
- Move the matchstick beneath the door to the gap to its left.
- Press Left to exit the box — exit is trivial from there.
Maze 6 — Sliding Puzzle
Mechanic: Classic tile slide — empty square is your friend.
Solution
Right, Right, Right, Right, Right, Right, Left, Left, Right, Right, Right, Right, Left, Left, Left, Left, Left, Right, Right, Right, Left, Left, Left, Left, Right
Maze 7 — Scrolling, Narrow Puzzle
Mechanic: Viewport scrolls — plan moves before you trap yourself in a one-tile corridor.
Solution
Right, Up, Right, Down, Right, Up, Up, Left, Up, Right, Up, Right, Down, Down
Maze 8 — Some Assembly Required
Mechanic: Build this shape from the scattered pieces (match the preview silhouette).
Solution
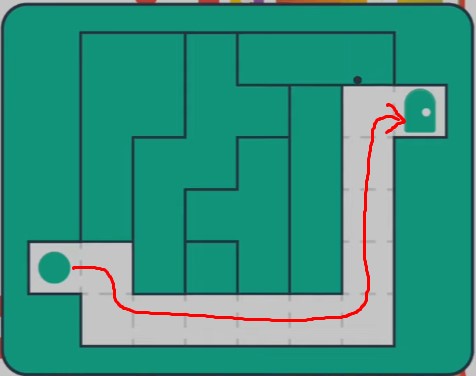
Assemble this shape. Exit is trivial once assembled.
Maze 9 — Eat All The Dots!
Mechanic: Pac-man rules — clear every dot, don't trap yourself.
Solution
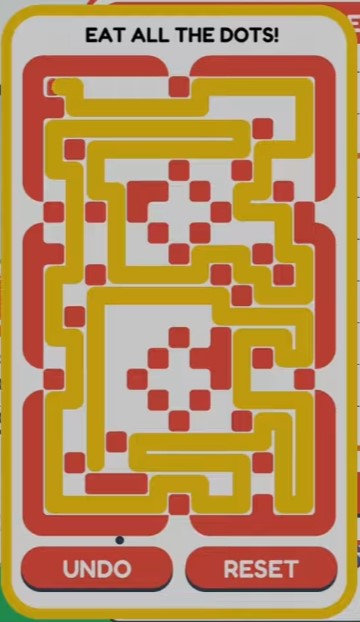
Up, Right, Down, Right, Down, Left, Up, Left, Down, Right, Down, Left, Up, Left, Down, Left, Down, Right, Down, Left, Up, Left, Down, Left, Up, Right, Up, Left, Up, Right, Up, Left, Up, Right, Down, Left, Down, Right, Down, Right, Up, Right, Down, Right, Down, Right, Up, Left, Up, Left, Up, Right, Up, Right, Up, Left, Down, Left, Up, Left
Maze 10 — I Drew This Puzzle On A Napkin Over Dinner
Mechanic: Tiny napkin grid — short and mean.
Solution
Up, Right, Up, Down, Up, Down, Up
Maze 11 — Auto-Tiles
Mechanic: Moving dots puzzle — arrange the tiles so connected dots auto-complete the maze.
Solution
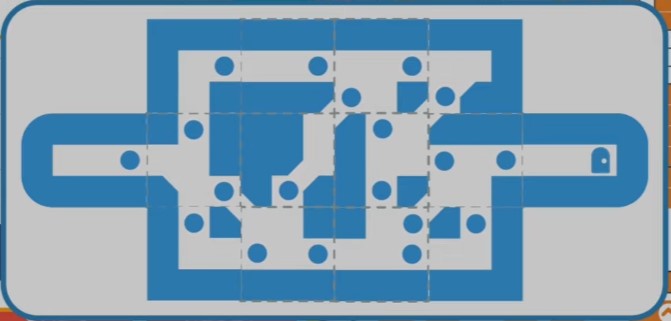
Assemble this arrangement. The dots will then complete the puzzle automatically.
Maze 12 — Unwanted Advertising
Mechanic: Pop-up ads block the maze — build an X close button, click it, repeat for every ad.
- Click the X to close the Goblin Turtle Peace Treaty ad.
- Push the X block: Right, Up, Up, Up, Right, Right, Right, Down, Down, Right, Right, Up, Up, Up, Up. Once it is in the broken corner, click X to close Have Mazes Gone Too Far?
- Push the bottom-left piece: Right, Up, Up, Up. Push the two pieces on the left: Right, Right. Push those two pieces again: Down. Push the piece on the right: Left. Click the assembled X to close Play Strange Jigsaws.
- Push the red square: Left ×6, Down ×5. Click the assembled X to close Extrareality Codebreaker.
- Move Up, Up — closes How Many Mazes?
Maze 13 — You Are The Maze-ish Thing
Mechanic: You move the maze walls, not always the dot — think backwards.
Solution
Right, Right, Up, Down, Left, Up, Left, Down, Right, Right, Left, Left, Up, Up, Right, Left, Down, Down, Right, Up, Up, Down, Left, Down, Right, Up, Left, Up, Right, Right, Down, Left, Left, Right, Right, Down, Left, Left, Right, Up, Up, Down, Left, Up
Maze 14 — Back From The Klondike
Mechanic: Solitaire-style logic — Learn with Flebby slides teach the rules first.
Learn with Flebby! — click through the slides.
Solution
Right, Left, Down, Down, Up, Left, Down, Up, Down, Right
Maze 15 — The Dots In These Mazes Do Not Move
Mechanic: Static dots — enter the three-digit code, then walk.
3-digit code puzzle
Enter 5 1 3. Exit is trivial once the code accepts.
Maze 16 — Magnifying Glass (Whoops Too Small)
Mechanic: Drag the magnifying glass over the tiny maze in the bottom-left — clear surrounding mazes first so you can see it.
Move the magnifying glass to examine the tiny maze in the bottom-left, once you have cleared away enough other mazes to see it. The solution inside the lens is trivial.
Maze 17 — Gee, I Hope This Maze Doesn't Explode
Mechanic: Maze explodes into pieces — reassemble, or use the alternative below.
Reassemble the maze after it explodes. Exit is trivial.
Alternatively:
Solution
Up, Up, Up, Up, Up, Up, Up, Left, Down, Down, Down, Down, Left, Down, Down, Right, Down, Left, Left, Up, Up, Left, Up, Left, Left, Left, Down, Left, Up, Up, Right, Up, Up, Up, Right, Right, Down, Left, Down, Right, Down, Right
Maze 18 — Connect 100% Of The Dots
Mechanic: Numbered dots — connect 100% in the order the puzzle shows.
Solution
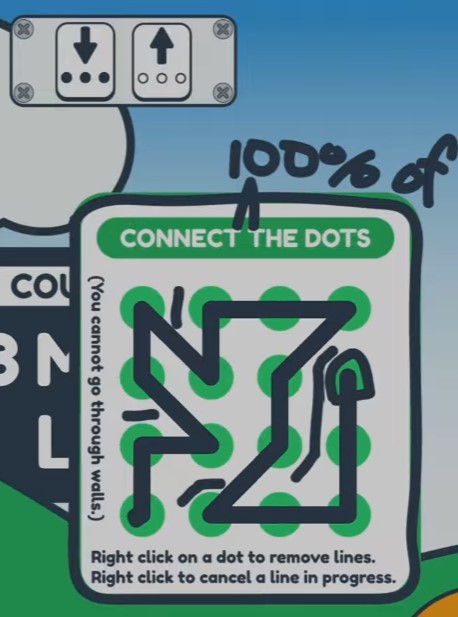
Connect the dots in this order.
Maze 19 — Enable Puzzle (Here Is A Door. Where Is The Dot?)
Mechanic: Press Enable Puzzle, then Zoom Out — drag the sun into the door.
- Press Enable Puzzle.
- Press Zoom Out, then drag the sun into the door.
- A trivial spiral maze appears — zoom out again to finish.
Maze 20 — The Final Maze
Mechanic: Spell LABYRINTH with movement keys (each letter = a move). Then unlock extra zoom.
Spell LABYRINTH
Follow in-game letter prompts on the grid.
Solution
Right, Right, Right, Left, Left, Up, Right, Up, Right, Up, Up, Right, Right, Right, Up, Right, Up, Left, Right, Right
Use your newly unlocked ability to zoom out further after credits.
Ending and achievement
Clear The Final Maze → watch the ending sequence. One Steam achievement: 100% completion. No missables once every puzzle is solved.
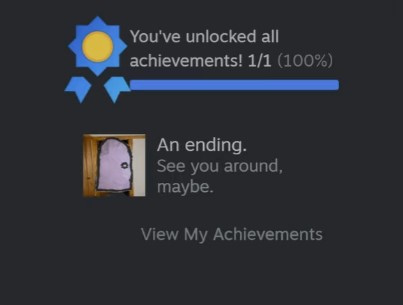
Ending — 100% achievement
Note: Some mazes say "trivial once assembled" in-game — that is not lazy writing, the game really means it. Assembly is the puzzle.
Done with 20 More, Somehow Even Smaller, Mazes? Pick next game.
Browse all guides or go back to homepage.
Browse all game guides →